Welcome Guest! Log in
Stambia versions 2.x, 3.x, S17, S18, S19 and S20 are reaching End of Support January, 15th, 2024. Please consider upgrading to the supported Semarchy xDI versions. See Global Policy Support and the Semarchy Documentation.

The Stambia User Community is moving to Semarchy! All the applicable resources have already been moved or are currently being moved to their new location. Read more…

Installing the Runtime - on Docker

    663 stambia plus docker

    Docker is the leading container platform and can be used to run Stambia runtime inside containers. This article explains how to build a simple runtime container by giving examples, and how you can prepare a unique container image that can be reused for several purpose. The installation of a docker client and the detailed command options are out of scope of this article, please refer to official documentation at Docker docs

    Prerequisites:

    • Stambia DI Runtime zip archive
    • Docker client environment ready


    You can use this Dockerfile example below as a basis to build your stambia runtime docker container :

    FROM openjdk:8u191-jre-alpine
    
    ENV STAMBIA_JAVA_HOME /usr/
    ENV STAMBIA_HOME /opt/stambia/stambiaRuntime/
    ENV STAMBIA_PROPERTIES_LOCATION /opt/stambia/stambiaRuntime/properties/
    
    COPY stambiaRuntime.zip /opt/stambia/
    COPY wait-for /opt/stambia/
    
    RUN unzip /opt/stambia/stambiaRuntime.zip -d /opt/stambia/
    RUN chmod -R 755 /opt/stambia/
    
    WORKDIR /opt/stambia/stambiaRuntime
    
    CMD ["/opt/stambia/stambiaRuntime/startengine.sh"]

    The file can be downloaded here  document Dockerfile (437 B) (remove the .txt file extension)

    The wait-for script can be used in case you need the container to wait for a particular HOST & TCP port to be reachable from the container before starting up the runtime. You can find this script at  https://github.com/eficode/wait-for

    If you don't need this script, remove the line "COPY wait-for /opt/stambia/" from the Dockerfile

    Prepare a folder containing the dockerfile and the stambiaRuntime.zip archive (and eventually the wait-for script) :
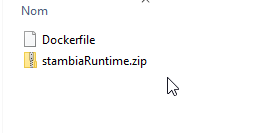
    663 docker build folder

    From this folder type the following commands to build the container image :

    >cd myDockerFolder
    >docker build . -t <containername>


    Example :

    >docker build . -t myrepo/devruntime


    The output should look like this :

    663 docker build output 

    Then you can start your container interactively (-it) using the following command :

    >docker run -it -p <hostport>:<guestport> --rm <containername>


    So for example to expose the ports 42000,42100,42101,42200 of the "devruntime" container to the same ports on your host you can run the following command :

    >docker run -it --rm -p 42000:42000 -p 42100:42100 -p 42101:42101 -p 42200:42200 myrepo/devruntime


    Alternatively, if you want to use different ports or start a second container on the same host, you can change the exposed ports to 43XXX instead of 42XXX for example :

    >docker run -it --rm -p 43000:42000 -p 43100:42100 -p 43101:42101 -p 43200:42200 myrepo/devruntime


    To change the java memory options you need to set the right environment variables for the container. You can use the ENV primitive of the Dockerfile or set the variables using the command line :

    >docker run -it --rm -p 42000:42000 -e "STAMBIA_MAX_MEMORY=2048m" myrepo/devruntime


    Notes :

    • STAMBIA_MAX_MEMORY environment variable does not exist at the time I'm writing this article (S17.6.6), but you can manually edit the initvariables.sh to reflect this behavior, or download the modified .bat/.sh scripts here : archive initVariablesScripts (3 KB)
    • You can review the environment variables reference in the official documentation


    If you need to have a folder of your container to be persisted on your host filesystem you can use the --mount option of the docker run command. For example if you want the technical log files to be written outside of your container you can use the following command :

    >docker run -it --rm -p 42000:42000 --mount type=bind,source=D:\Docker\runtime\sharedFolder\log,target=/opt/stambia/stambiaRuntime/log myrepo/devruntime


    Please be aware that the mounted folder will replace the folder inside your container and the files inside the container folder will not be reachable anymore.

    For the technical logs there are other possibilities as the log4j system used by the runtime allows the configuration of log appenders to send log information to multiple destinations (see documentation at https://logging.apache.org/log4j/1.2/manual.html). A minor change can be made to send all the logs to the standard output which is a common best practice with docker. It can be done by editing the log4j.xml file inside the properties folder to add the console appender to every logger. For example for the logger "com.indy.engine.rdbmsLog" :

    <logger name="com.indy.engine.rdbmsLog">
            <level value="info"/>
            <appender-ref ref="consoleAppender"/>
            <appender-ref ref="rdbmsLogAppender"/>
    </logger>


    This setup is only suitable for a developement environment, if you want to be able to change the configurations dynamically, you will have to prepare a container with more flexible configurations. This can be done by updating the configuration files to use environment variables using the syntax described in this article. It can be useful to set dynamically the ports, log database configuration, scheduler configuration etc. It can also be used to change the folder paths of the container to target a unique folder mounted outside the container and so avoid to mount each folder separately.

    Communications from Stambia Designer and Stambia Analytics to the runtime can be made using RMI or HTTP depending on your runtime version. Please refer to this article for more information

    Installing the Runtime - in a CentOS 7 server

      Installing Java 8

      [support@centos7vm ~]$ sudo yum install java
      ...
      [support@centos7vm ~]$ java -version
      openjdk version "1.8.0_191"
      OpenJDK Runtime Environment (build 1.8.0_191-b12)
      OpenJDK 64-Bit Server VM (build 25.191-b12, mixed mode)

      Installing the Runtime

      [support@centos7vm opt]$ ls -l
      total 46348
      -rw-r--r--.  1 root root 47454806 Dec 21 16:16 stambiaRuntime_S17.6.3_20181220_113216.zip
      [support@centos7vm opt]$
      [support@centos7vm opt]$ sudo unzip stambiaRuntime_S17.6.3_20181220_113216.zip
      inflating...
      [support@centos7vm opt]$
      [root@centos7vm opt]# ls -l
      total 46348
      drwxr-xr-x. 13 root    root   4096 Jan  8 10:51 stambiaRuntime
      -rw-r--r--.  1 root    root    47454806 Dec 21 16:16 stambiaRuntime_S17.6.3_20181220_113216.zip

      You can adjust the file owner and permission to your security policy, for example :

      [support@centos7vm opt]$ sudo chown -R stambia:stambia stambiaRuntime
      [support@centos7vm opt]$ sudo chmod 755 stambiaRuntime/*.sh

      At this point, take the time to configure your Runtime (ports, log database, security options...) in /opt/stambiaRuntime/properties/engineParameters.xml.

      Also add your JDBC drivers and addons to /opt/stambiaRuntime/lib

      Declaring the Runtime service in systemd

      Create a systemctl service file, for example /etc/systemd/system/stambiaRuntime.service :

      [Unit]
      Description=Stambia Runtime
      After=network.target
      [Service]
      Type=simple
      Restart=always
      RestartSec=5
      User=support
      WorkingDirectory=/opt/stambiaRuntime
      Environment=STAMBIA_JAVA_HOME=/home/stambia/java/jre1.8.0_151
      Environment="STAMBIA_HOME=/opt/stambiaRuntime"
      ExecStart=/opt/stambiaRuntime/startengine.sh
      [Install]
      WantedBy=multi-user.target

       Please consult your Linux Distribution documentation for more information on systemd and how to configure this file to match your needs and requirements.

      Operating the service

      [support@centos7vm stambiaRuntime]$ sudo systemctl start stambiaRuntime
      [support@centos7vm stambiaRuntime]$ sudo systemctl restart stambiaRuntime
      [support@centos7vm stambiaRuntime]$ sudo systemctl stop stambiaRuntime
      [support@centos7vm stambiaRuntime]$ sudo systemctl status stambiaRuntime


      Checking the Linux service status

      [support@centos7vm log]$ sudo systemctl status stambiaRuntime
      [sudo] password for support:
      ● stambiaRuntime.service - Stambia Runtime
         Loaded: loaded (/etc/systemd/system/stambiaRuntime.service; disabled; vendor preset: disabled)
         Active: active (running) since Fri 2018-12-28 13:50:42 CET; 11min ago
       Main PID: 3630 (startengine.sh)
         CGroup: /system.slice/stambiaRuntime.service
                 ├─3630 /bin/sh /opt/stambiaRuntime/startengine.sh
                 └─3633 java -Xms32m -Xmx512m -Xss256k -Dstambia.classpath.v1.root= -classpath /opt/stambiaRuntime/.:/opt/stambiaRuntime/lib/comdcom:/opt/stamb...
      Dec 28 13:50:46 centos7vm startengine.sh[3630]: 28/12/2018 13:50:46,380 - Runtime version: s17.6.3_20181220
      Dec 28 13:50:46 centos7vm startengine.sh[3630]: 28/12/2018 13:50:46,381 - Java version: 1.8.0_191 vendor: Oracle Corporation home: /usr/lib/jvm/j...6_64/jre
      Dec 28 13:50:47 centos7vm startengine.sh[3630]: 28/12/2018 13:50:47,287 - Internal Database is started: 192.168.75.134:42100
      Dec 28 13:50:47 centos7vm startengine.sh[3630]: 28/12/2018 13:50:47,350 - Internal Database Web Server is started: http://192.168.75.134:42101
      Dec 28 13:50:50 centos7vm startengine.sh[3630]: 28/12/2018 13:50:50,902 - RMI server is started: rmi://192.168.75.134:42000
      Dec 28 13:50:54 centos7vm startengine.sh[3630]: 28/12/2018 13:50:54,129 - Scheduler is started
      Dec 28 13:50:55 centos7vm startengine.sh[3630]: 28/12/2018 13:50:55,797 - SOAP Endpoint: http://centos7vm:42200/wsi/DeliverableService?WSDL
      Dec 28 13:50:55 centos7vm startengine.sh[3630]: 28/12/2018 13:50:55,798 - SOAP Legacy "Non WSI-Compliant" Endpoint: http://centos7vm:42200/Stambi...ice?WSDL
      Dec 28 13:50:55 centos7vm startengine.sh[3630]: 28/12/2018 13:50:55,798 - HTTP Rest Endpoint v2: http://centos7vm:42200/rest/StambiaDeliveryServi...eryName>
      Dec 28 13:50:55 centos7vm startengine.sh[3630]: 28/12/2018 13:50:55,798 - HTTP Rest Endpoint v1: http://centos7vm:42200/rest/StambiaDeliveryServi...eryName>
      Hint: Some lines were ellipsized, use -l to show in full.


      Checking the Runtime state

      See this article: http://www.stambia.org/doc/58-stambia-di-software/runtime/how-to/64-checking-that-the-runtime-is-up-and-running

      [support@centos7vm stambiaRuntime]$ ./startcommand.sh "connect to localhost port 42000;get services"
      Connecting to localhost on port 42000
      Connected
      Name      Status  Duration
      rmi       Running 0:14:36.715
      soap      Running 0:14:31.819
      listener  Running 0:14:36.928
      rdbms     Running 0:14:40.266
      execution Running 0:14:36.927
      scheduler Running 0:14:33.487


      Installing the Runtime

        When you install a new Stambia DI Runtime there are some things you have to think about.


        About installation

        Complete installation procedure can be found in reference documentation.

        You can find it on stambia.org at the following location.

        You can also find it in Stambia DI Designer's Help Contents under Runtime Installation and Configuration Guide.

        Refer to those documentation entries to learn how to install a new Stambia DI Runtime.

        This article only gives additional tips about the installation procedure.


        If you are upgrading from a previous version, please refer to this article.


        Choosing a Java version

        The correct Java version to use will depend on your environment and what you will do with the Runtime.

        You can find below some important advices about how to choose the correct Java version for your case:

        • Stambia DI Runtime 2020 (S20.0.0) and higher works with Java 8 and Java 11
        • Stambia DI Runtime S17.x.x works with java versions 6, 7, and 8.
        • Make sure to select a Java version compatible with:
          • your JDBC drivers (Oracle, Mysql, Sqlserver...)
          • the Components you will use (SAP, Salesforce, Amazon...)
          • the encryption algorithms you may need for SSL-secured connections (SFTP, SSH, HTTPS...)
        • Make sure to use the same Java version on all your environment, such as your development, testing, or production environments! This is a really good practice to avoid bad surprise when deploying jobs in production.


        Tips and advices

        Here is some other useful tips which may help you during the process.


        First run: Check the output of the startengine

        Before installing Stambia DI Runtime as a service, check if everything is working by starting the Runtime with the startengine.bat (or startengine.sh) script.

        It is easier to see the errors that might happen during the startup this way.

        Then if everything is correct and working, you can install it as a service.


        Example of Output:

        C:\Users\stambia\Developpement\Designers\stambiaDesigner_S18.0.3_20150625_081118\stambia\stambiaRuntime>echo off
        21/08/2015 11:00:18,485 - Runtime version: s17.2.14_20150625
        21/08/2015 11:00:18,486 - Java version: 1.6.0_43 vendor: Sun Microsystems Inc. home: C:\Program Files\Java\jdk1.6.0_43\jre
        21/08/2015 11:00:19,052 - Internal Database is started: stambia-pc20:42100
        21/08/2015 11:00:19,073 - Internal Database Web Server is started: http://stambia-pc20:42101
        21/08/2015 11:00:21,885 - RMI server is started: rmi://stambia-pc20:42000
        21/08/2015 11:00:24,400 - Scheduler is started
        21/08/2015 11:00:25,633 - SOAP Endpoint: http://stambia-pc20:42200/wsi/DeliverableService?WSDL
        21/08/2015 11:00:25,633 - SOAP Legacy "Non WSI-Compliant" Endpoint: http://stambia-pc20:42200/StambiaDeliveryService?WSDL
        21/08/2015 11:00:25,633 - HTTP Rest Endpoint: http://stambia-pc20:42200/rest/StambiaDeliveryService/1/<deliveryName>


        Prevent the command line from closing when errors at startup

        When launching the startengine script, if there are errors at startup then the console's window opens and closes immediately, and you cannot see the errors.

        To avoid that:

        1. Open a command line prompt
        2. Then, type cmd (in windows, or bash for example in linux) in order to open a sub process.
        3. Navigate to the place where the startengine script is and execute it.

        Now, if the Runtime closes on errors it will come back to the first command line process, and you will still have the errors displayed.

        Once the reasons for the errors are solved (most often Java installation issues), of course you do not need to do this again.


        Installing the Runtime - as a Linux service

          Here is a sample init.d script for executing the Runtime as a Linux service.

          This sample script should be adapted to your specific Linux distribution, server architecture and enterprise best practices.
          Please consult your Linux distribution's docs to know how to install and register a service.

          Sample script

          This sample script executes the Runtime as the "stambia" user. Please adapt it to your particular needs (directory, runtime port, user...).

          We have created this script in file /etc/init.d/stambiaRuntime

          And then we registered the service for startup with this command: sudo update-rc.d stambiaRuntime defaults

          #!/bin/sh

          # runtime install dir
          export dir=/data/stambiaRuntimeSupport

          # runtime port - necessary for stopping the runtime
          export port=42000

          start()
          {
            su - stambia -c "cd $dir;nohup ./startengine.sh &"
          }

          stop()
          {
            su - stambia -c "cd $dir;./stopengine.sh -port $port"
          }

          restart()
          {
              stop;
              sleep 1;
              start;
          }

          case $1 in
          start)
            start;;
          stop)
            stop;;
          restart)
            restart;;
          *)
            start;;
          esac

          Starting / Stopping the service

          Simply replace "stambiaRuntime" with your init.d script name:

          $ sudo service stambiaRuntime start
          $ sudo service stambiaRuntime stop
          $ sudo service stambiaRuntime restart


          Articles

          Suggest a new Article!